Hi Everyone,
I came down with something on Friday and had to cancel my craft class. I'm on the mend but not 100% yet! :-(
Below is one of the projects for this month's craft class. This technique is the crinkle ink technique and I made it into the mini album. Of course my topic was belly dancing ;-)
You will be learning more ink techniques on tags and glossy paper and if I get my act together I will have them posted before class.
Below are photos of the crinkle ink technique; sorry I forgot to turn on my flash so they are a little dark.
Enjoy your week...
Monday, March 12, 2012
Sunday, March 4, 2012
I Won!!!!
I'm so excited I won the card competition today!!! My to-go coffee cup card won the "I Need Coffee" category!
To think I almost didn't enter the card competition this time; I'm so glad my friends talked me into entering.
The next stamp convention will be November 3rd & 4th. The categories will be Under the Sea and Chinese Art.
Mesa Arts Center Mini Albums Class
This Tuesday will be the mini albums class at the Mesa Arts Center.
You will be creating 3 albums that are not so mini :-) We will be using 45 records to create a book style album, an album record to be displayed on the wall or in a plate stand and the CD holder is a great gift to give to someone special. We will be creating a cover to hold a CD that contains music or family photos.
No need to bring photos if you don't have a them in mind for your albums; you can add photos later.
Below are photos of 2 of the projects we will be making in class.
I had a photo shoot and my photographer gave me a CD of all the photos from the day. I created this CD cover to house the CD and placed photos from some of the pictures from the day to decorate the holder.
The album is of my two puppies Nitro and Blue. Behind each photo is journaling of the photo.
Hopefully I will have photos of the 45 record album up before class.
Enjoy your week and hope to see you in class...
Saturday, February 25, 2012
Coffee Cards for Card Competition
Yeah, finally finished all the cards for the card competition on March 3rd & 4th!!! I need to get them in the mail today so they arrive before the deadline.
The first coffee card I made to look like a to-go coffee cup. For the background paper I dyed a coffee filter using 3 different color inks from ink refillers from Stampin' Up. I took some scarp brown paper and ran it through my crimper and colored in the one and only coffee stamp I have for a label. The card is bright and fun.
The second coffee card I went in a different direction and I must say it really doesn't say coffee to me. I wanted to make a flower using coffee filters and that was my main thought for this card. The background paper is a register from a hotel register from 1898. I cut several strips of designer card stock and sewed all the elements together. I stamped a library book check out card and mounted it to a piece of card stock I ran through my crimper. I didn't have a stamp with a coffee saying on it so I found a saying on the Internet and typed it out using my word processor software and printed it out on regular copy paper. I punched it out using an oval punch, scrunched up the paper and distressed it using distress inks. I mounted it to a piece of plain card stock and attached it to the library card. I purchased vanilla seam binding ribbon from Stamping up hoping I could dye it for whatever color I wanted and I can! I tied one bow using the ribbon as is and using my green distress ink pad and sponge applicator I created the green ribbon for the second bow and tied them together. I will be ordering more of this vanilla ribbon I love it!
I dyed more coffee filters using alcohol inks this time and using the smallest scallop circle Spellbinder dies created the flower. This was so simple! I cut 2 of the smallest larger die and 4 of the smallest dies, put a brad in the center and scrunched each layer to create the flower. I popped up the flower on the card and the card was done. I love making the flowers and see a lot more of them in my future :-)
I'll let you know if I place or win...cross your fingers that the judges love my cards.
Labels:
Card Competition Entries,
coffee card,
coffee filter
Thursday, February 23, 2012
More Vellum Cards for Competition
I can't believe how long it is taking me to create these cards for the card competition at the Stamp Convention on March 3rd & 4th! I have spent the last two days working on the second card for the vellum category.
I came up with 2 cards and I don't know which one to enter!
I usually make two cards of every design I come up with and as of yet only one card exists for all these vellum cards! I'm enjoying working with this new medium but it's giving me a headache :0)
The first card went through several generation before this final product. It started out with a window design by cutting a window in the center of the card using a scallop circle Spellbinder die. I added a piece of vellum I had dry embossed with an embossing folder. This piece is the background to this card so part of the original is present :-). I created the flower by stamping the vellum using my French word background stamp. I cut the vellum into 3/4" strips and running them through my Xyon sticker machine. I cut a 1 1/4" circle using a circle punch and covering the circle with tape to adhere the vellum with. I started on the outside of the circle gathering the vellum strip as I went around the circle. I did the same technique on the inside of the circle and added a vintage brad in the center. I cut out two frames using a couple of Spellbinder dies and stamped "Love You Much" on vellum for the center of the round frame. I added 3 pearls in the upper left corner to balance out the card.
The second card I used alcohol inks on vellum scraps I had and that was a lot of fun! After the inks dried I stamped flowers and leaves with versa mark and embossed the vellum using white embossing powder. I cut out the flowers and leaves and attached them to vellum I embossed using small dots embossing folder. The card needed something so I added pearls on three of the flowers and a sheer ribbon across the middle of the card.
After asking my hubby which one he liked and my friend TJ it looks like the bright spring floral card will be the 2nd card I will enter in the competition!
Monday, February 20, 2012
Vellum Card for Competition
I wasn't going to enter the card competition at the Stamp Convention at the Mesa Convention Center on March 3rd & 4th. Every one told me I should so I spent several hours yesterday and today working on a vellum card.
I really haven't worked with vellum that much so I did some searching online for some techniques. YouTube had some interesting videos and gave me some good ideas.
I tried a technique called Frosted Spellbinders and the first card didn't turn out the way I wanted it to so I tried again and I like this card so much better than the first one; so does my hubby :0)
I used a Spellbinder die to cut out the backing of the vellum in olive green card stock. I than cut out a piece of vellum using the same die and turned it over to work on the back side with my stylus tool. After indenting the outside bubbles I used a white pencil to darken the color in each bubble. I than followed the outline of the scallop part of the die using a smaller head on the stylus. I took a small round Spellbinder die to trace around the outside of the die in the center of the vellum and than cut a piece of very vanilla for the center piece with "Thanks" on it. Using my piercing tool I put holes throughout the piece.
I added vellum butterflies for some spice. I used distress embossing powder in tea dye to give the vellum butterflies some color. I first used white embossing powder but didn't like the white with all the vanilla in the paper on the card.
For the card itself I used Old Olive and added a piece of Purely Pomegranate behind the designer paper called Botanical Gazette all from Stampin' Up. I added lace trim and very vanilla ribbon along with half pearls in vanilla coloring.
I distressed the pomegranate paper and designer paper by roughing up the edges and using old olive ink. After distressing the paper I sewed the two pieces together around the edges.
I think this one is a keeper and will enter it. Now I need to make another style of vellum card for Saturday's contest; you can enter two in each category. I will post it when it's finished.
Here are a couple of photos of my card.
Friday, February 17, 2012
February Card Class, 2012
Finally I have a chance to post the cards from last Saturday's card class. It was a fun class and different than what I usually teach. I mainly focus on techniques but this class I taught a couple of techniques and we made cards for various holidays.
The technique I taught was the soot technique and I loved it!!!! I've always wanted to try this technique and thought this would be a perfect technique for the Halloween card and it was!!
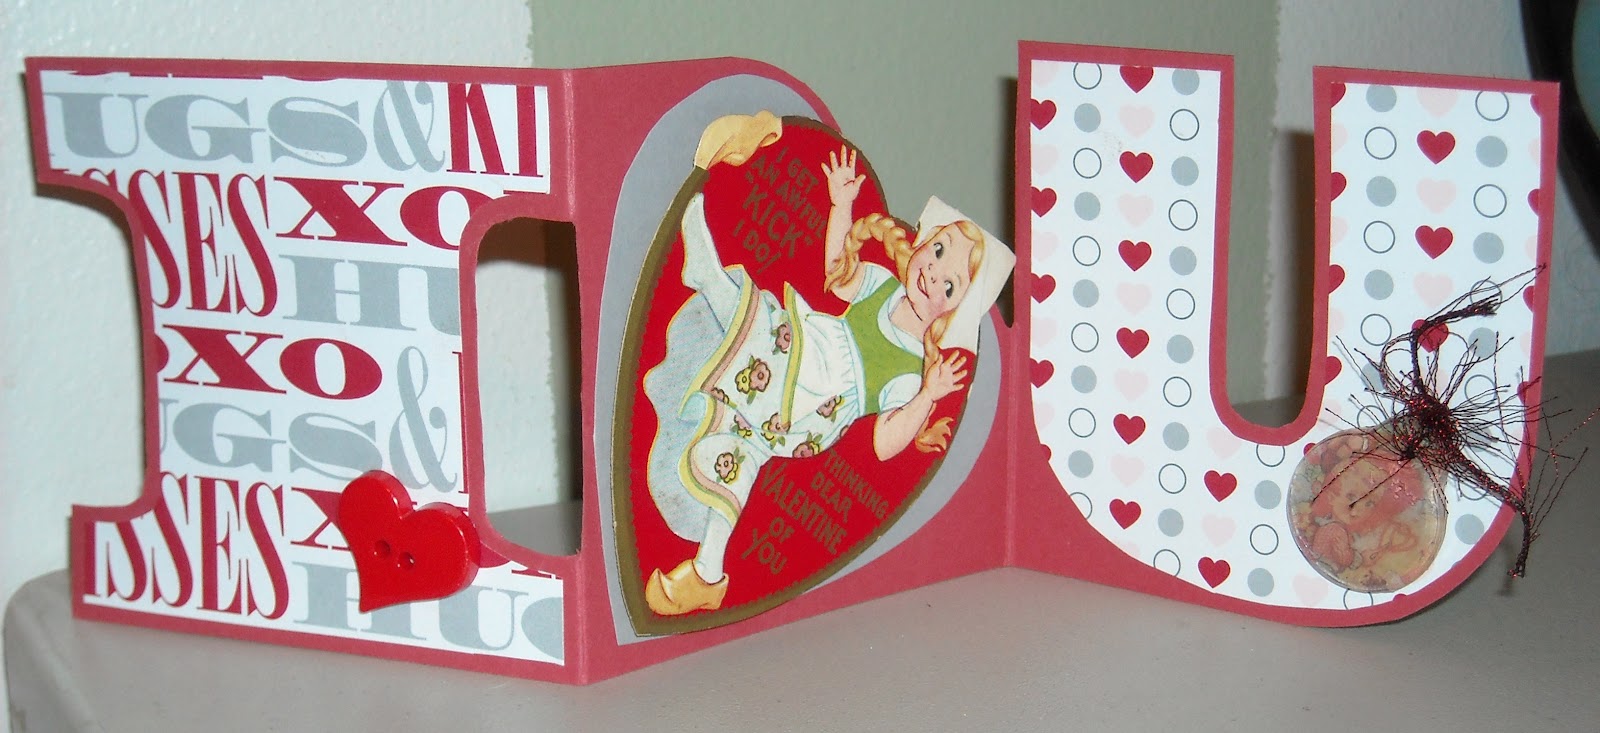
The other cards we made really didn't have any techniques to them at all just cards. We did a Mother's Day & Father's Day card but you could use them for any occasion, a Word card for Valentine's Day and a Center Fold card.
Below are photos from the days class.
Enjoy your weekend and take care...
The technique I taught was the soot technique and I loved it!!!! I've always wanted to try this technique and thought this would be a perfect technique for the Halloween card and it was!!
The other cards we made really didn't have any techniques to them at all just cards. We did a Mother's Day & Father's Day card but you could use them for any occasion, a Word card for Valentine's Day and a Center Fold card.
Below are photos from the days class.
Group shot of all cards
Father's Day card
My favorite soot technique and no one burnt down my house :-)
Mother's Day Card
Center fold card for Thanksgiving
Another center fold card
Word card for Valentine's Day
Second Valentine Card
Enjoy your weekend and take care...
Subscribe to:
Posts (Atom)