Tuesday, March 12, 2013

March 2013 Vintage Card Class

I loved creating this months card class since I love everything vintage.  I had so many ideas that I couldn't do everything I wanted to so I'm just going to have to teach this class again to include the cards I didn't include this month.

Below are the cards we made Friday night.

group shot of all cards

Photo tint technique

close up of photo tint technique

                                                                   pretty vintage card

                                                                        gatefold card

                                                               triple stamp technique

Next class will be May 17th at the Mesa Arts Center.  Below is registration info:

Greeting Cards with a TwistThis class we will be making cards that are fun and interactive. Cards with pop-ups, moving parts, lots of folds, pockets and more; unique cards that your friends will be so impressed and ask “how did you make this?” These cards will make you smile.
Supply cost $5 to be paid at class. Please bring scissors and your favorite glue.
Room: Multi-purpose behind registration
CAW13PCW024-01 F May 17 6-9pm $23

Hope to see you in class...

Monday, February 18, 2013

January 2013 MAC Card Class

I'm so behind in my blogging it seems working 3 jobs is taking up all my time; yikes :-)

January I taught a "simple" card class at the Mesa Arts Center; we made 10 cards. 

I taught 9 cards and surprised the class on card 10 that they were creating their own card.  I wish I would have taken my camera with they made some pretty cool cards.  I provided the stamp set and the brown card base they did the rest with scrap paper, ribbon, inks, markers, etc.

Below are photos of the cards we made minus the creations from class:


Next card class is March 8th and it will be Greeting Cards with a Vintage Flare.  Here's more info on this class:

Greeting Cards with a Vintage FlareLace, jewels, pearls, vintage photos and more create the beautiful and timeless vintage style. We will be making greeting cards with that vintage flare and using distress inks and tools to give your cards that distress look. To make your cards even more personal you will learn how to take a copy of a family photo and age it and use it on one of your cards.
Supply cost $5 to be paid at class. Please bring scissors and your favorite glue.
Room: Multi-purpose behind registration
CAW13PCW023-01 F March 8 6-9pm $23

register by calling the Mesa Arts Center box office, (480)644-6520, or drop off your registration at the Art Studios at the Mesa Arts Center lobby.
late registration call (480)644-6520
brochures are at the Mesa Arts Center or visit the Mesa Arts Center website, http://www.mesaartscenter.com/index.php/classes/paperarts.

Hope to see you in class...

Wednesday, October 10, 2012

Holiday Card Class 2012

I had a difficult time deciding on what holiday cards to make this year so we will be making 7 cards and some cute little boxes that hold a candy kiss.

I kept the cards simple this year since we are making so many :-)

Below are photos of our cards.

group shot of all cards and boxes

The Hanukkah card has a diagonal background by using my Score Pal to create the design.  This was very simple and I have always wanted to try this technique and it looks great.  The stamp is from Stampin' Up the single "Hanukkah" stamp is retired from last year.

I used the "Beautiful Season" Stampin' Up stamp for this next card.  I used colored pencils and blending pen for the coloring for the stamp image.  The outside design is created by the embossing folder "framed tulips" also by Stampin' Up.  I used crumb cake ink to highlight the design and the card stock color is Very Vanilla.
 

For this card I used the new "Make a Mitten" stamp set and the new mitten punch, both by Stampin' Up. The greeting is from "Four the Holidays" a retired stamp set.  The designer paper is Holiday Treasures retired from Stampin' Up.

I haven't done an origami card in a long time so back by popular demand this years origami card :-)  The card shape I used the framelits "labels" from Stampin' Up.  I used the largest framelit for the card and the next size down for the front of the card sentiment.  The greeting and holly leaf is from the retired stamp set "Peaceful Season".  Inside the card I used stamps from "Jolly Bingo Bits" and scallop square & 1" square punch all from Stampin' Up. The designer paper is Holiday Treasures.
I found the origami instructions on Cathy's blog, Stamps & Scrapbooks; she has a video on how to fold and create this card.

This cute card I used the new "Ornament Keepsakes" and matching Holiday Ornaments framelits from Stampin' Ups Holiday Catalog.  For the center of the ornaments I used a jewel, a pearl and dazzling details silver color.  The baker's twine is of course from Stampin' Up color Cherry Cobbler. 

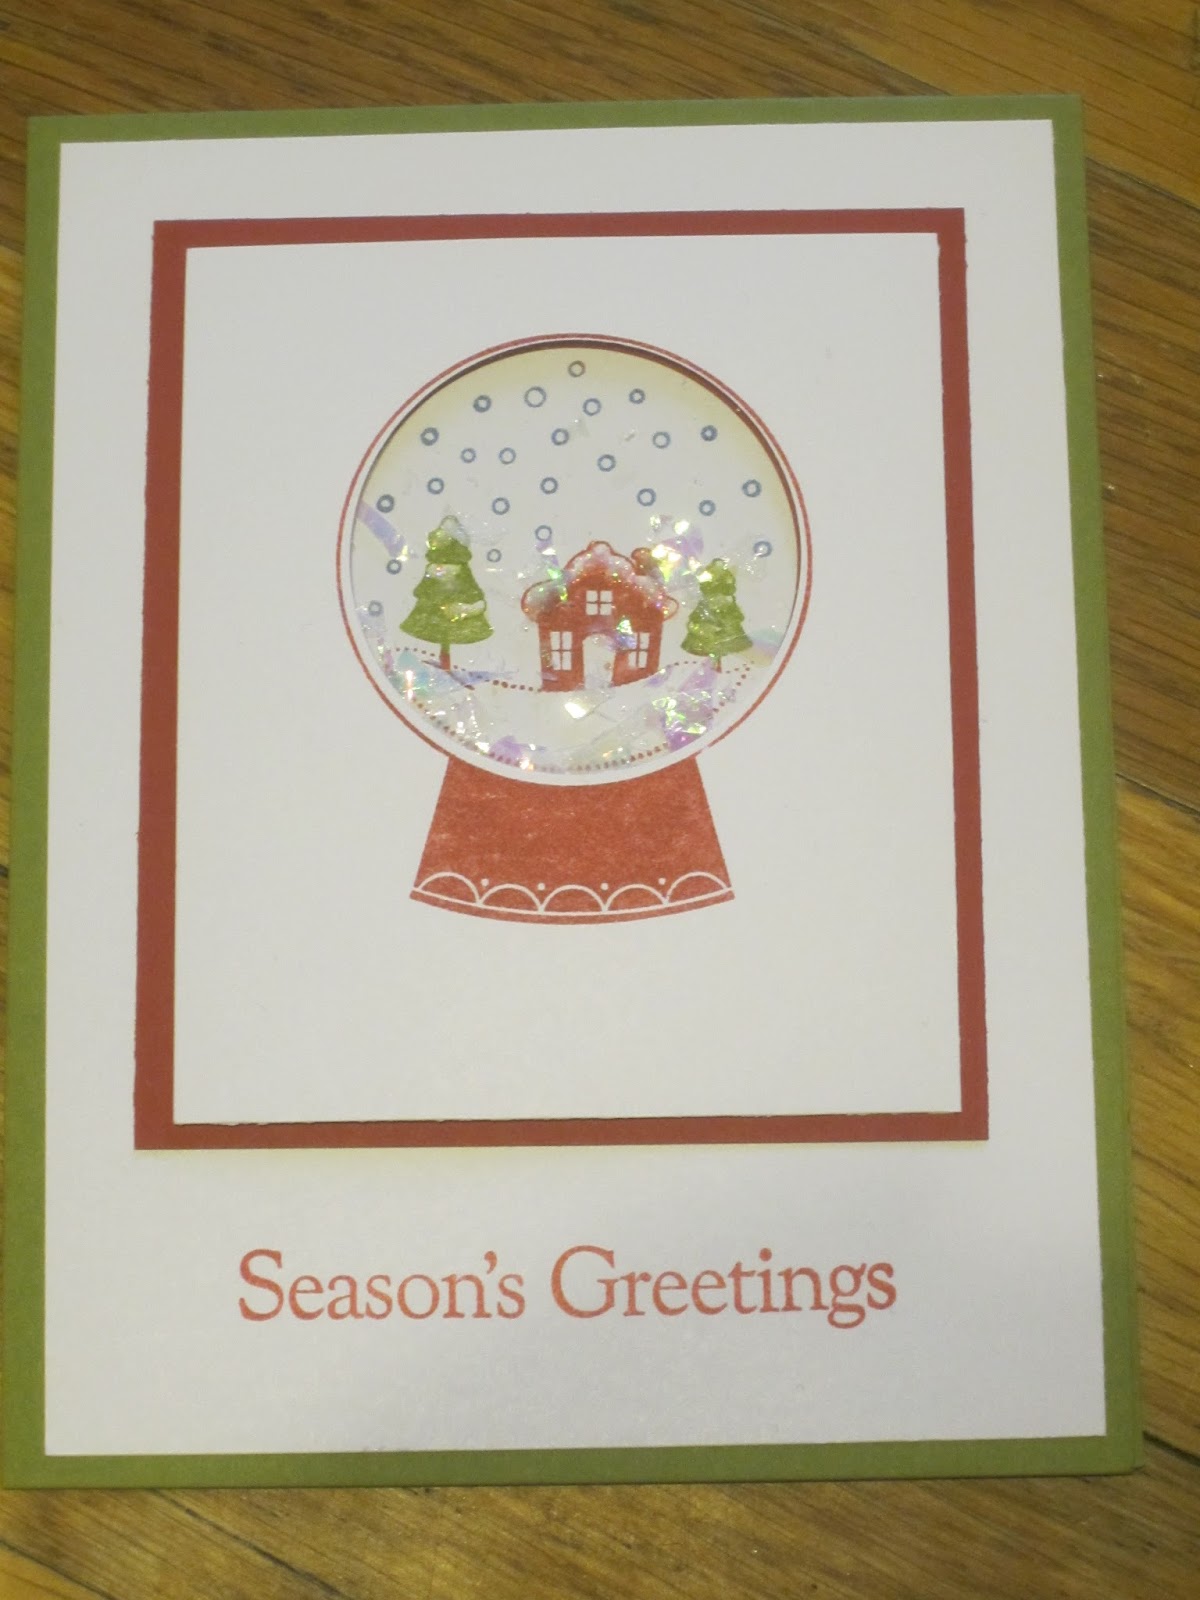
Here's this year's shaker card that doesn't shake :-(  I didn't make it thick enough for the mica flakes to move around but I love the look of the card anyway.  The stamp is "Sweet Snowglobe" a retired single stamp from last year. I also used dazzling details for the snow on the trees and little house.  It's difficult to see the detail; sorry.

I love this card I finally used the background stamp "Christmas Collage" a retired stamp from Stampin' Up.  I stamped the background on white card stock and colored in certain areas.  Using a square 1 3/8" punch I punched out areas of the background and attached to white card stock with the Framed Tulips embossed around the outside.  I used crumb cake to distress each square and bring out the embossed edge.  The greeting is from "Four the Holidays" stamp set.

These cute little boxes hold one candy kiss!  I used the "Petal Card Double" punch from Stampin' Up to create these cute little boxes.  To decorate the outside I used stamps from "Jolly Bingo Bits".  I found the directions for these boxes from Mary of "Stampin' Pretty".  Here's the link to her video on how to make these cute little boxes.


I made this cards simple enough that you could use whatever holiday stamps you may have in your craft room.  I hope you enjoy these cards and hope to see you in class.

Enjoy your week...

Wednesday, August 29, 2012

Paper Bag Album, part 2

Hi Everyone, Well I finally did it I created my first craft video!!!  Now that I have done this and it worked I will be creating tutorials also; I can't wait!  I already now what tutorial I will be doing first, dryer sheet flowers.  This will need to wait until I finish my paper bag album.

The video contains the two mini albums I made to go into my paper bag album.  This is episode 2 parts 1 & 2 from Kathy of Paper Phenomena. 

Enjoy the video and I will be posting more when I create more mini albums to go inside my paper bag album.

video


Tuesday, August 28, 2012

August 2012 Card Class

Saturday was a busy day in crafting; loved it!  What better way to spend a day with friends and fellow crafter's creating new things; doesn't get any better than that.

For this month's class we made 3 cards with 3 different techniques and one card style.  Faux linen, faux silk, embossed kisses and a double dutch card.

My favorite was the faux linen and faux silk techniques.  I combined both techniques on one card and loved how they turned out I will do this technique again.  For the faux linen you take glossy paper and sand it in one direction than turn the card stock and sand in the same direction until all the glossy is off the paper.  Take distress ink and you can see the horizontal and vertical lines giving it that fabric look; so cool.

The faux silk was fun and so simple.  Stamp an image on tissue paper, crinkle the tissue paper up to create wrinkles.  Unfold the tissue paper and glue it to a piece of card stock removing some of the wrinkles but not all of them.  What a quick and easy technique.

The embossed kisses didn't work so well and I need to experiment more with it.  What we did create was cool it just didn't transfer the 2nd ink color from the embossing folder so I'll experiment with different color inks and see what happens.

The double dutch card was simple to make but wasn't my favorite style of card.

Below are photos of my cards.

Group shot of all cards

Faux linen background and faux silk center flower

Close up of faux silk

Embossed kisses technique is on the guitarist with the marble technique as the background.  The top guitarist I used a spider web embossing folder and the bottom guitarist I used a folder with circles.

Double dutch fold card open on the left closed on the right.


Next class will be September15th with all new techniques and card style.

New Paper Bag Album

Last Saturday I taught 2 classes; one my monthly card class and the other was a paper bag class.  While I was sending out class instructions I did a search on paper bag albums and found the coolest video on YouTube and a new way to cut and fold a paper bag to create a paper bag album.  Now I need to re-teach my class since I love this new way of creating this style of album.

The instructor of this video series is named Kathy and her blog is Paper Phenomenon.  She creates the most beautiful projects; I will definitely be checking out all her projects and tutorials on her blog.

I recently did my family tree on my mom's side of the family on Ancestry.com and I thought I would order one of there books when I was done.  Well I didn't like their format so I wanted to make my own and since I've really never done a scrapbook was getting overwhelmed on how to create my family album.  When I saw this project by Kathy I knew with was the way to go.

So far I have created the basic album so now I need to start creating the mini albums that go inside; there are 9 videos in her series and I'm on episode 2 part 1 :-)  Needless to say I have a long way to go.

Below are photos of what I have put together so far.  I will update my blog with more photos after each episode.

This is the 1st page, I still need to create the front and back cover but that's episode's 7 & 8

Page 2 showing the flap up

Page 3 which is the same as the 1st page

Page 4 with the large tag pulled out and the flap up

Page 5 with the large tag pulled out

Page 6

Page 7

Page 8

Page 9

Page 10

Page 11 where you can see the pockets plus the large tag

Last page showing the pockets in the flap and along the side. 


As you can see I still have a lot to do and can't wait to create all the mini albums that go inside to hold photos, documents and more.  Than I get to decorate with all my family photos.  The goal is to have this done by Christmas this year :-)

Monday, July 16, 2012

Another Cigar Box!

What a great day today I got so much accomplished!!!  I wanted to make a few more cigar boxes for class on Saturday and created this little number. 

I love the color of this cigar box so I only covered the top with a little bit of thin trim around the sides.  The inside is simple with covering the inside lid.  I added large wooden beads on the bottom of the box and this little guy is all done.

The buttons on top I made with my melting pot and a set of molds.  I highlighted the buttons with Perfect Pearls.

The feet on the cigar box are large wooden beads and they matched the color of the cigar box perfectly, I didn't do a thing to them ;-)

The background paper on the top and inside lid is from Tim Holt's and I added a vintage belly dance theme picture.  I used the same trim on the inside as I used on the outside.


I also made 6 necklaces and a bracelet and will be posting photos soon on these beauties.

Enjoy our week...