It has been way too long since my last post, super busy with dancing and life and it will be so great to get back to crafting again!!!
 group shot of all the cards we made in class
The shaving cream technique we did the tag on top of the box. It's amazing how you get such a cool marble effect from cheap shaving cream and ink refillers.
 shaving cream
Placing rubber bands on your brayer and running them over a stamp pad gives you cool effects on plan paper. We did the front of the valentine card using red and pink ink and crossing the paper in different directions. The inside of this card the valentine hearts are attached to thin pieces of acetate for a very fun card and a total surprise when you open the card. This would be great for any occasion by using candles, Halloween ghosts; whatever.

rubber band

inside card
We made a very simple card with the smackin' acetate technique. Using markers and a spray bottle of water along with a piece of acetate gives you a nice water color effect on your paper.

smackin' acetate
Marbles some ink refillers and a container with a lid creates a fun design on your paper and a whole lot of noise!! :-) This is a fun technique and very simple for the results you get.

marbles

hubbies Valentine
On Feb. 20th I taught a card class at my hope studio where we learned 4 new techniques. The techniques were Joseph's Coat, paper frame, cracked glass and bouncing brayer.
 group shot of cards we made on the 20th

Joseph's Coat (sorry the photos dark)
The paper frame is quick and easy way to display a photo or cute stamp image. It really makes the subject of your card pop!

picture frame
I have always wanted to try the cracked glass technique and finally did and it was much easier than I thought it would be. Stamp your image and color it in. Emboss your paper using thick embossing powder around 3 - 4 times making the embossing really thick. Let it sit and cool than when you bend the paper the embossing cracks like glass when it's been hit with something. I rubbed the piece with a dabber and brown ink to bring out the cracks.

cracked glass
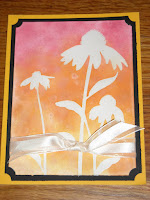
The last technique was the bouncing brayer that was a lot of fun. The real colorful background I used a multi-colored ink pad which I liked the best. I cut out a circle using my 1 1/4" circle punch and taped it on my card stock before I bounced my brayer to create the sunset tye dye effect. Using black ink I silhouetted the flowers on top and added butterflies from my Sizzix embossilits die cut.

bouncing brayer
Our next class will be mini albums on March 13th so I need to get busy and start crafting!
I taught a technique card class at the Mesa Art Center on Feb. 8th. There were 5 different techniques I taught: shaving cream, marble, rubber band, smacking acetate and burnt batik.
 group shot of all the cards we made in class
The shaving cream technique we did the tag on top of the box. It's amazing how you get such a cool marble effect from cheap shaving cream and ink refillers.
 shaving cream
Placing rubber bands on your brayer and running them over a stamp pad gives you cool effects on plan paper. We did the front of the valentine card using red and pink ink and crossing the paper in different directions. The inside of this card the valentine hearts are attached to thin pieces of acetate for a very fun card and a total surprise when you open the card. This would be great for any occasion by using candles, Halloween ghosts; whatever.

rubber band

inside card
We made a very simple card with the smackin' acetate technique. Using markers and a spray bottle of water along with a piece of acetate gives you a nice water color effect on your paper.

smackin' acetate
Marbles some ink refillers and a container with a lid creates a fun design on your paper and a whole lot of noise!! :-) This is a fun technique and very simple for the results you get.

marbles
Have you ever over heated your embossing? Well turn it into burnt batik were you over heat your embossing on purpose! Once your paper has cooled add ink refillers by using a sponge and wipe the ink from the paper when it has dried. The ink comes off the areas that you over embossed.

burnt batik
The valentine card with all the hearts coming out of the envelope we didn't make in class this was my hubby's valentine card for this year. I didn't have a picture of it so I placed it in with this lot of cards :0)

hubbies Valentine
On Feb. 20th I taught a card class at my hope studio where we learned 4 new techniques. The techniques were Joseph's Coat, paper frame, cracked glass and bouncing brayer.
 group shot of cards we made on the 20th
Joseph's Coat is similar to the crayon technique we did as kids. To start the process brayer on color from a multi-colored ink pad to you have it to the desired brightness. Emboss your design and when it cools brayer over the piece with black ink. After your paper dries rub the background using a paper towel to reveal the image in all it's color.

Joseph's Coat (sorry the photos dark)
The paper frame is quick and easy way to display a photo or cute stamp image. It really makes the subject of your card pop!

picture frame
I have always wanted to try the cracked glass technique and finally did and it was much easier than I thought it would be. Stamp your image and color it in. Emboss your paper using thick embossing powder around 3 - 4 times making the embossing really thick. Let it sit and cool than when you bend the paper the embossing cracks like glass when it's been hit with something. I rubbed the piece with a dabber and brown ink to bring out the cracks.

cracked glass
The last technique was the bouncing brayer that was a lot of fun. The real colorful background I used a multi-colored ink pad which I liked the best. I cut out a circle using my 1 1/4" circle punch and taped it on my card stock before I bounced my brayer to create the sunset tye dye effect. Using black ink I silhouetted the flowers on top and added butterflies from my Sizzix embossilits die cut.

bouncing brayer
Our next class will be mini albums on March 13th so I need to get busy and start crafting!
No comments:
Post a Comment